The AI has done its job. Your site exists — it has a structure, a hero headline, a services section, an about blurb, and a contact form. And most of it is actually pretty good. But the headline says something close to what you mean, not quite what you mean. The services section describes what you do in general terms rather than your specific language. One image is a stock photo that has nothing to do with your business.
This is not a problem with MakeOurs. It is how AI-generated content always works — it gives you a strong scaffold. The editing is where you make it yours. The MakeOurs editor works through the left sidebar: you select a section there, a panel opens showing that section's fields, and you edit the content in those fields. Nothing is edited by clicking directly on the preview.
This guide covers exactly how to edit landing page content on MakeOurs after generation — text, images, buttons, and contact details.
1. Getting into the MakeOurs Editor
Log in to MakeOurs and go to your dashboard. Find the site you want to edit and select the Edit Site button. This opens the builder with your site loaded.
The screen splits into two areas: the left sidebar (your editing panel) and the right preview pane (a live iframe showing your site). The preview updates as you make edits in the sidebar. Nothing changes on your live published site until you click Publish.
On mobile, the sidebar is hidden by default. Tap the hamburger menu (☰) in the top-left to open it as a full-screen drawer. All editing works identically on mobile — it just opens as an overlay rather than sitting permanently on the left.
2. How to Edit Headlines and Section Text
Text is not edited by clicking words in the preview. Here is the actual flow:
- In the sidebar on the left, you will see a list of your sections — Hero, About, Services, FAQ, Contact, etc.
- Click the section whose text you want to change. It highlights in blue.
- A section editor panel slides in on the right side of the sidebar, showing text input fields for that section.
- Edit the text directly in those fields — headline, subheadline, button label, description paragraphs, and so on.
- The preview updates live as you type.
- Click the back arrow (←) at the top of the panel to return to the sections list when done.
What makes a strong hero headline:
- Says exactly what you do and who you do it for
- Contains a benefit, not just a description ("We help Pune startups get investor-ready in 30 days" beats "Professional financial consulting services")
- Fits comfortably on two lines at most on desktop
- Works without the subheadline underneath it — a good test of whether it is carrying its weight
Work through the section list from top to bottom. Click each section, read what the AI wrote in the fields, and replace anything that is generic, inaccurate, or not in your voice.
3. Editing Body Paragraphs and Descriptions
For sections with longer body copy — an About description, a Services paragraph, or a Content section — the panel shows a multiline text field (or a list of paragraph fields, depending on the section type).
Click the multiline field, select the existing text, and type or paste your replacement. The AI often writes accurate but bland descriptions. "We offer a range of services to meet your business needs" is technically true of almost any company. Replace it with specifics.
Tips for better service copy:
- Lead with the outcome, not the process. "Your accounts are filed on time, every time — no penalties, no last-minute scrambles" says more than "We provide GST filing services."
- Use your customers' language, not industry jargon. If they call it "an estimate," use that word instead of "a project scope document."
- Keep paragraphs short. Visitors skim — walls of text are ignored.
- Cut filler lines. If a sentence does not say something specific and true about your business, delete it.
4. Editing CTA Buttons
Button text like "Learn More" and "Get Started" are the most common AI defaults — and the least compelling.
To edit a button: click the section containing it in the sidebar, then find the button field in the section editor panel. You can edit both the label (what the button says) and the URL (where it goes when clicked).
More specific button labels work better:
- "Get a Free Quote" instead of "Contact Us"
- "See My Work" instead of "Portfolio"
- "Book a Free Class" instead of "Sign Up"
- "Check Our Menu" instead of "Learn More"
Make sure every button links somewhere real — your contact page, your pricing page, a booking tool, or a section anchor lower on the same page.
5. How to Replace AI-Generated Images
Images are not replaced by clicking on them in the preview. Here is the correct process:
- In the sidebar section list, click the section that contains the image you want to replace.
- The section editor panel slides in. Scroll to find the image field for that section.
- The image field shows:
- A preview of the current image (with an X button in the top-right corner to clear it)
- A Media Library button below the preview
- A URL input field for pasting an external image link
- An Alt text field for the image description
- To upload a new image: click Media Library, then upload from your device or choose an existing upload.
- To use an image from the web: paste the direct image URL in the URL field.
- The preview updates immediately once you select or paste an image.
Image selection guidance:
| Section | Best image choice |
|---|---|
| Hero banner | A clear, high-quality image of your product, space, or team |
| About section | A real photo of you or your team in your actual workspace |
| Portfolio | Your actual work — finished projects, products, deliverables |
| Testimonials | Headshots of real customers (only with permission) |
A sharp photo from a recent smartphone is better than a generic stock image. Real photos of your actual business build trust in a way that stock images never quite do.
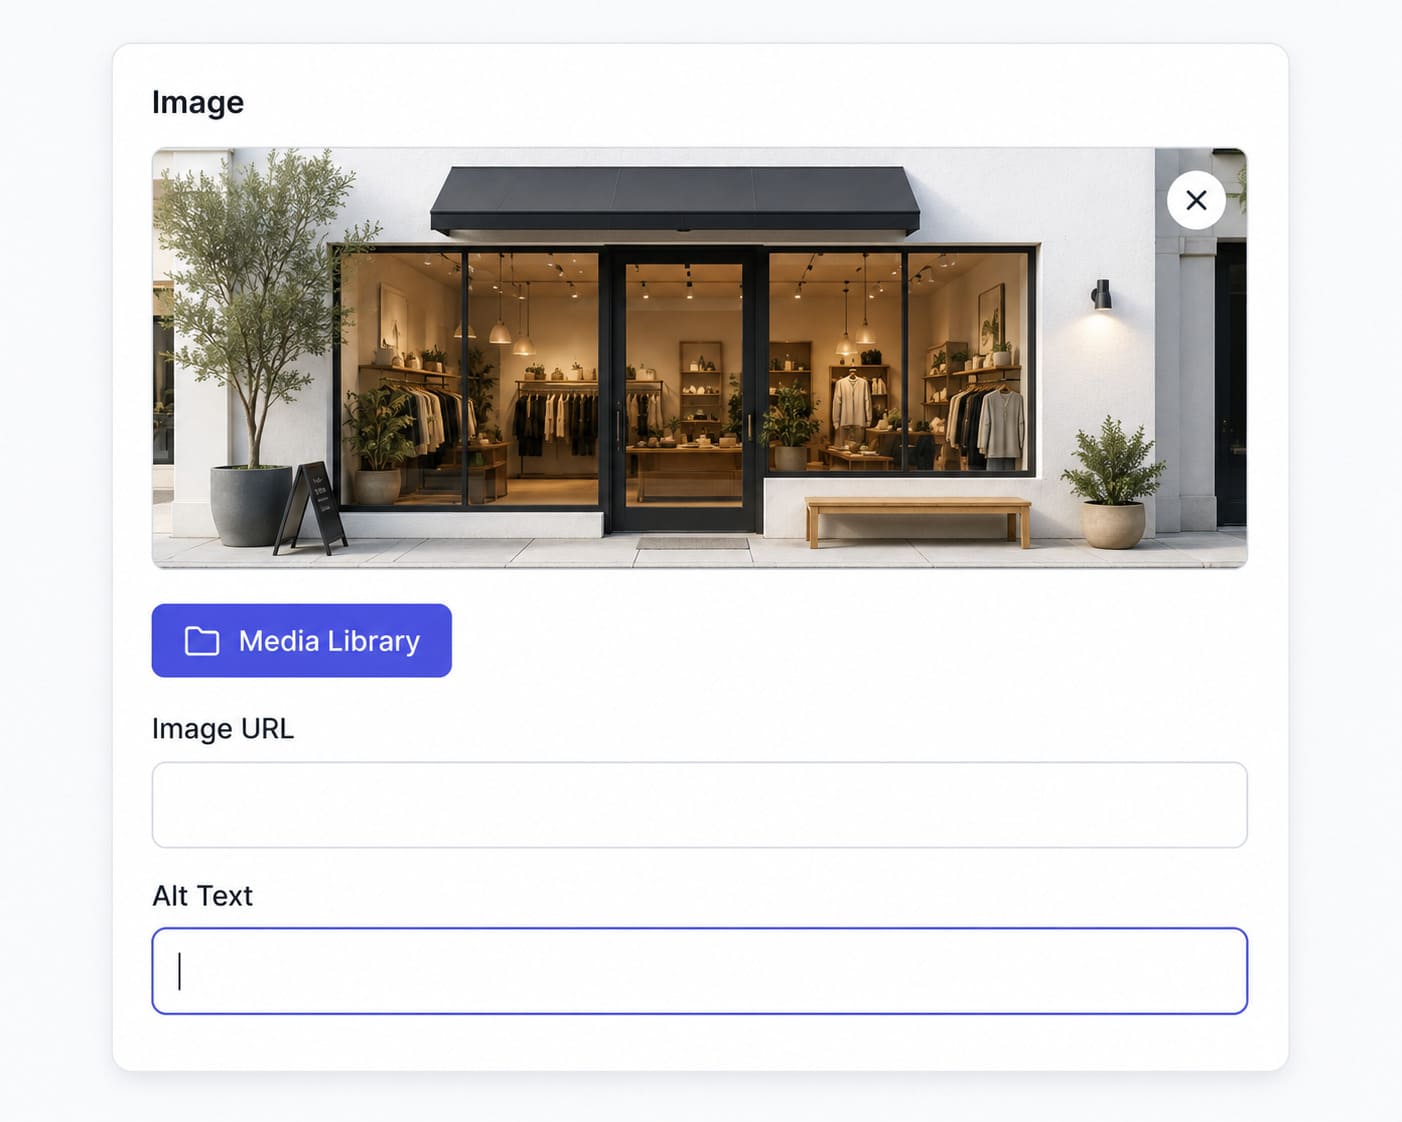 The image field in the section editor panel has two ways to add an image: the Media Library button for uploading, or the URL input for pasting an external link. The X button clears the current image.
6. Reviewing AI Copy for Accuracy
Before you publish, read through every piece of text the AI wrote — not just the sections you already edited. In the sidebar, click each section one by one and check its fields. Look for:
Factual inaccuracies: Did the AI invent services you do not offer? State a price that is wrong? Mention a location that does not apply? Fix these immediately — inaccurate facts on a business site erode trust fast.
Overpromises: AI copy sometimes overstates things. "India's leading provider of" or "guaranteed results" — if you did not write these and cannot back them up, remove them.
Generic filler: Sentences like "We are committed to excellence in all we do" say nothing. Delete them. Every sentence should say something specific and true about your business.
Your contact details: The contact section often gets pre-filled with placeholder values from your prompt. Check that your email, phone, and address are correct.
7. Editing the Contact Section
Click the Contact section in the sidebar. The section editor panel shows:
- A title field and description text above the form
- Contact detail fields: email address, phone number, address
- The form itself (name, email, message fields) — these are standard and not individually removable
Make sure your email and phone are correct. Replace the generic title ("Contact Us") with something more specific: "Get a Free Quote," "Book a Consultation," or "Send Us a Message."
Add a response time promise in the description text — "We reply within 24 hours on weekdays" is simple but significantly reduces hesitation from visitors who are not sure anyone will see their message.
8. Check Your Edits on Mobile Before Publishing
After editing, switch the preview to mobile view. In the top header bar, click the Mobile icon (phone icon) from the device toggle group. This constrains the preview canvas to 375px width, simulating a phone screen.
Check:
- Do headlines wrap onto too many lines?
- Do images crop in a way that cuts the subject out?
- Do buttons look big enough to tap?
- Does the text in each section feel too dense on a narrow screen?
These controls are available on desktop only — if you are using the builder on a phone, you are already seeing the mobile-size preview naturally.
Fix anything that looks off. Most sections reflow automatically, but text length and image composition both affect how they look on small screens.
9. Frequently Asked Questions
Q1: How do I edit my landing page on MakeOurs?
Open the builder from your dashboard. In the left sidebar, click the section you want to change. A panel opens showing that section's fields. Edit the text, images, and buttons in those fields. The preview updates live. Click Publish when you are ready to go live.
Q2: Can I undo a text edit if I make a mistake?
The builder tracks editing history internally, but there are no visible undo/redo buttons. If you want to reverse a change, edit the field back to what it was. For a section you want to completely reset, you can remove it and add it back — though you will need to re-enter content.
Q3: How do I add a new section if I need one that the AI did not include?
In the sidebar, click the + button at the top of the sections panel. A dialog opens showing all available section types. Click the one you want to add it to your site. See our guide on adding and rearranging sections for step-by-step instructions.
Q4: Where do contact form submissions go?
Submissions are stored in your MakeOurs dashboard under the form submissions section for your site. Log in, go to your site's dashboard, and open the Form Submissions section to see every enquiry with full details.
Q5: What happens to my edits if I close the browser without publishing?
The builder auto-saves your edits to your browser's local storage every second while you have unsaved changes. If you close the browser, your edits are still there when you reopen the builder. To save to the cloud (not just locally), click the Save Draft button in the header.
10. Conclusion: The AI Wrote the First Draft — Now Make It Yours
Every writer knows the hardest part of writing is the blank page. The AI solved that for you. Your site has structure, content, and layout already in place. Your job now is to edit it from "generic but functional" to "this is clearly this specific business."
Work through the sidebar section by section. Fix the headline first. Update the services copy. Replace the stock images with real photos. Verify every factual detail. Preview on mobile. Publish.
The whole process, done properly, takes 30–60 minutes. The result is a site that looks like you made it — because you did.
Your site is waiting for its final edits. Open the editor and make it exactly right. Edit Your Site on MakeOurs
External References & Further Reading:
- Web.dev: Writing for the web — clarity, readability, and structure
- Nielsen Norman Group: How users read on the web
- Google Search Central: Content quality guidelines
Want more tips on getting the best results from your MakeOurs site? Visit our Blog section.